Crafting a video script for a product demo or explainer video is not easy because it involves three things: words, sound, and visuals.
Many copywriters and content writers find it challenging to write a video script for a product demo or explainer video because of the complex structure of a video script.
Are you one of those🤔?
🙋 If your answer is yes!
This guide is for you because I designed it, especially for people who have been searching for a proven method to craft an effective video script for a product or explainer video.
So whether you are a copywriter, content writer, independent entrepreneur, or small business owner with a low or no budget, you can benefit from this guide.
This step-by-step guide will help you learn video script copywriting from scratch.
In this guide, you will learn the following:
- The art of writing for the ears, not only the eyes.
- Script visualization.
- How you can tell a story.
- Video script all three essential writing intro, middle, and outro.
- Understanding of dos and don’ts for video script.
- Tips, tricks, techniques, and strategies to create engaging video scripts for product demos and explainer videos.
So these are things which you will learn with the help of this guide.
Let’s get started!
Understanding of video script
In this section, I am going to discuss the essentials of video scripts. With their help, you can create the structure of your video script, what the components of a video script are, and its categories.
It is very important to understand the Anatomy of a video script because if you can’t recognize the main components and essential categories, you won’t be able to write a perfect video script.
So, in the first step, let’s discuss the three main categories of video script, and then we will discuss the components of each category.
Three main categories of video script:
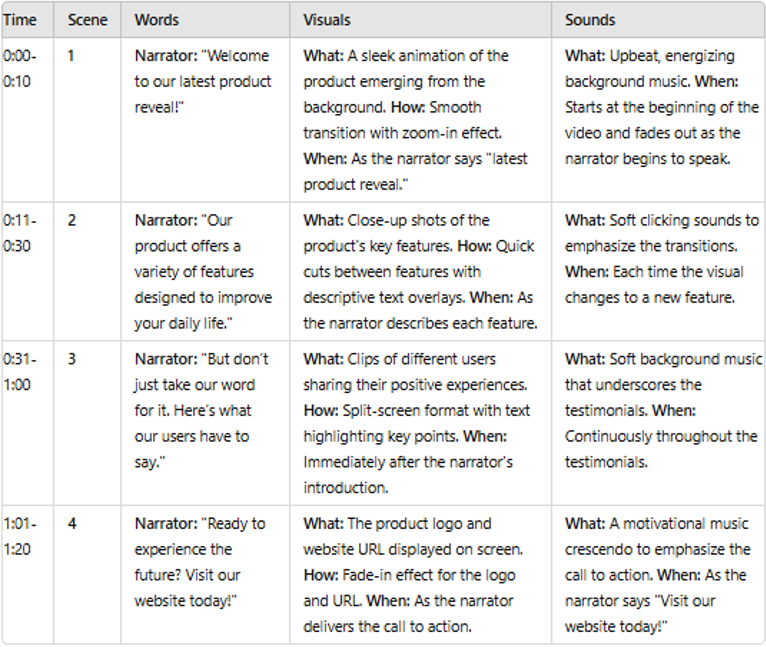
- Word: The spoken content told by the narrator or the dialogue said in the video.
- Sound: Audio includes background voice (voice-over), music, and other sound effects.
- Visuals: images, movements, and graphics on the screen accompanying the words.
Components of Word
- What: This is the first component of the word. It describes what dialogues will be spoken.
- By Whom: The second component of words specifies who says what means. It defines which character will say which dialogue.
Components of Sound
- What: It specifies what the audio elements should be, such as dialogue, narration, etc.
- When: It describes the time frame, how long, and when audio plays in the video.
Components of Visual
- What: It specifies what visual elements, such as (images, graphics, or seen) should show on the screen.
- How: It defines the arrangement of how the visual elements will show on the screen, such as (camera angles, style of visuals, and movements).
- When: It specifies the time frame, how long, and when visuals appear on the screen.
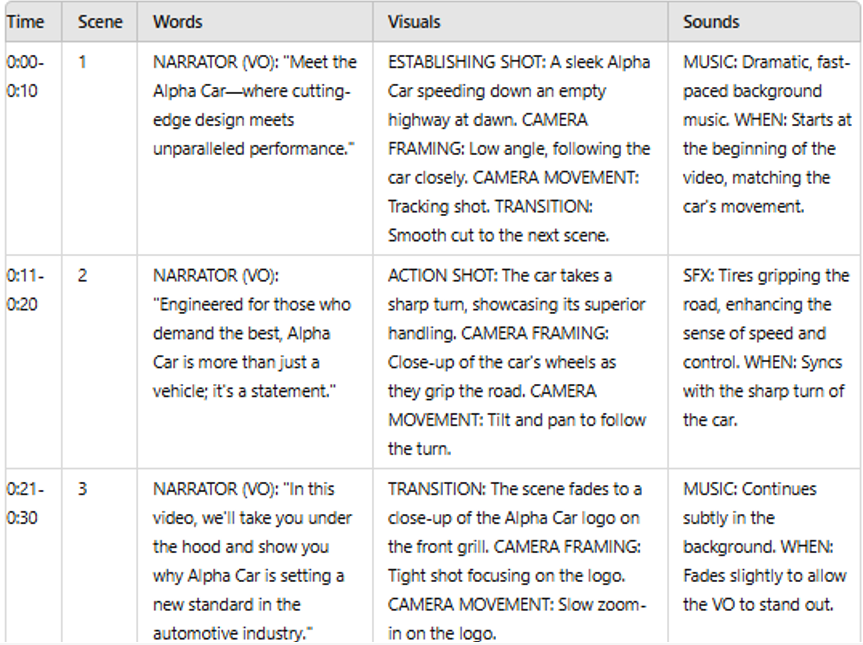
Now, for a better understanding, let’s look at a video script structure example.
Video Terminology
In this section, you will learn about terminology used by professional writers to facilitate the video script for the video production team.
It is essential because if you want to write your video script as professionals write, so you have to write the script in a way that tells your video production team:
- what to say.
- How to say.
- what to shoot.
- How to shoot.
- What should the sound effects and music be?
- How do you include those sound effects and music?
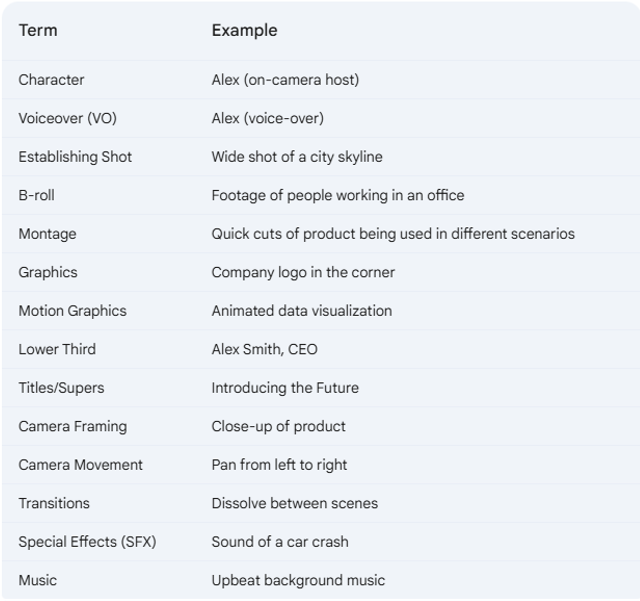
There are fourteen main terminologies that help ensure clarity and facilitate the video production team’s creation of high-quality videos.
Let’s discuss each one by one:
- Character: This terminology describes the person who is speaking in the video.
- Voice Over: This describes the person’s voice that is not visible on the screen.
- Establishing Shot: This terminology defines where the video takes place.
- B-Roll: This terminology defines side shorts that are not the main action but are used to illustrate the main action, which means shorts that bridge the gap in your story.
- Graphics: This terminology is used for static diagrams or images displayed on screen.
- Motion Graphics: This term is used to mention animated graphics.
- Montage: This terminology defines the sequence of video clips that convey a concept or idea.
- Lower Third: This terminology refers to the text displayed in the lower third of the screen.
- Title or Supers: This term mentions text that is superimposed over the video footage.
- Camera Framing: This term specifies the size and position of the subject within the frame, which means how the camera will capture a shot, such as a close-up, wide shot, or medium shot.
- Camera Movement: This term describes how the camera moves during the shot.
- Transition: This term defines how one visual cuts to another.
- Special Effects: You can also mention this term in short (SFX). It is used to describe specific sound effects.
- Music: This term describes the type of music and its duration.
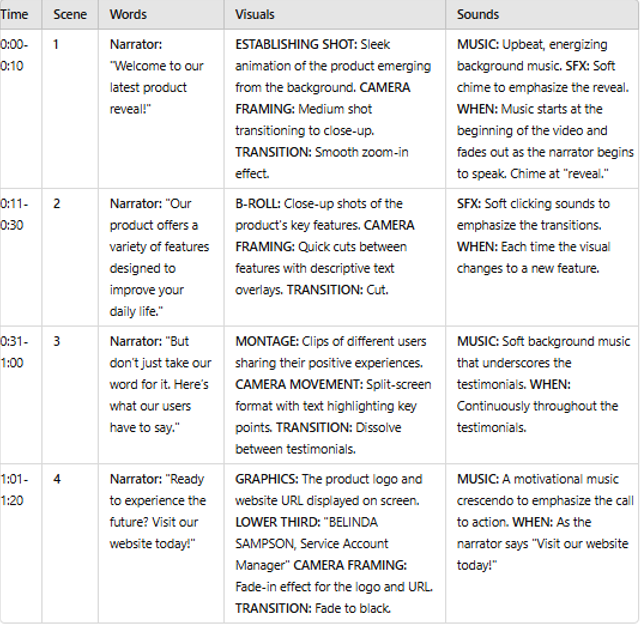
Examples of each terminology:
What to know Before you start
In this section, I will discuss several key things that you should understand before working on script writing. These things are essential because with the help you brainstorm and with the help of them, you can ensure intended message delivery that resonates with your target audience.
So, Let’s discuss what is important for you to know before starting to work on a video script.
Goal of the video
It is very important for you to know the video’s objective, whether it is to inform, persuade, or demonstrate.
Because a clear understanding of the objective helps you effectively shape the tone, structure, and content of your script.
Length of the video
Determine the length of your video because a clear understanding of video duration will help you write a laser-focused script. Moreover, it will also help you maintain focus on the amount of information you need to convey.
Audience of the video
Before writing a video script, understanding the audience is the most important thing. You have to have a clear idea of the target audience’s demographics, psychographics, behavior, and geographic location.
Availability of B-Roll
If someone has already shot the B-Roll of your explainer/demo video, you must include them in your script.
On the other hand, if you don’t have any B-rolls, give directions in your video script about what B-rolls should be shot or go online and buy them. B-roll footage will help you plan visual storytelling more effectively.
Images Availability
If necessary, your explainer/demo video will include images such as charts, shots, graphs, and other visual aids.
Make sure you have the necessary images because you need to see them before you start writing. Along with this, you have to have a clear idea of how many of them should be included in the video.
Screencast Availability
Like images and B-Roll, you need to know if screencasts (screen recordings that can be used in your video) exist or if your team recorded them. If you have so, use them because screencasts are helpful for the product demonstration process.
SME Access
SME stands for subject matter specialist, who can provide you with valuable insights. Before starting to write a video script, if you have access to an SME, ask him or her about product technical details, features, benefits, etc.
Product literature Availability
Ensure the availability of product literature. Literature can provide detailed information about product specifications. Marketing material or user manuals can be used as product literature.
Product understanding
In this section, I will discuss important points that will help you understand the product in detail.
Remember one thing: a demo/explainer video works like a salesperson. Companies need these videos because they have a finite number of salespeople.
These videos help companies demonstrate their products and free up salespersons who would instead focus on other tasks than a product demonstration.
In simple words, this type of video acts as a salesperson because it demonstrates/explains your product, so it is essential for you to understand the product deeply if you want to write a perfect script.
The best way to better understand a product is to conduct a guided tour with a salesperson or subject matter specialist (SME).
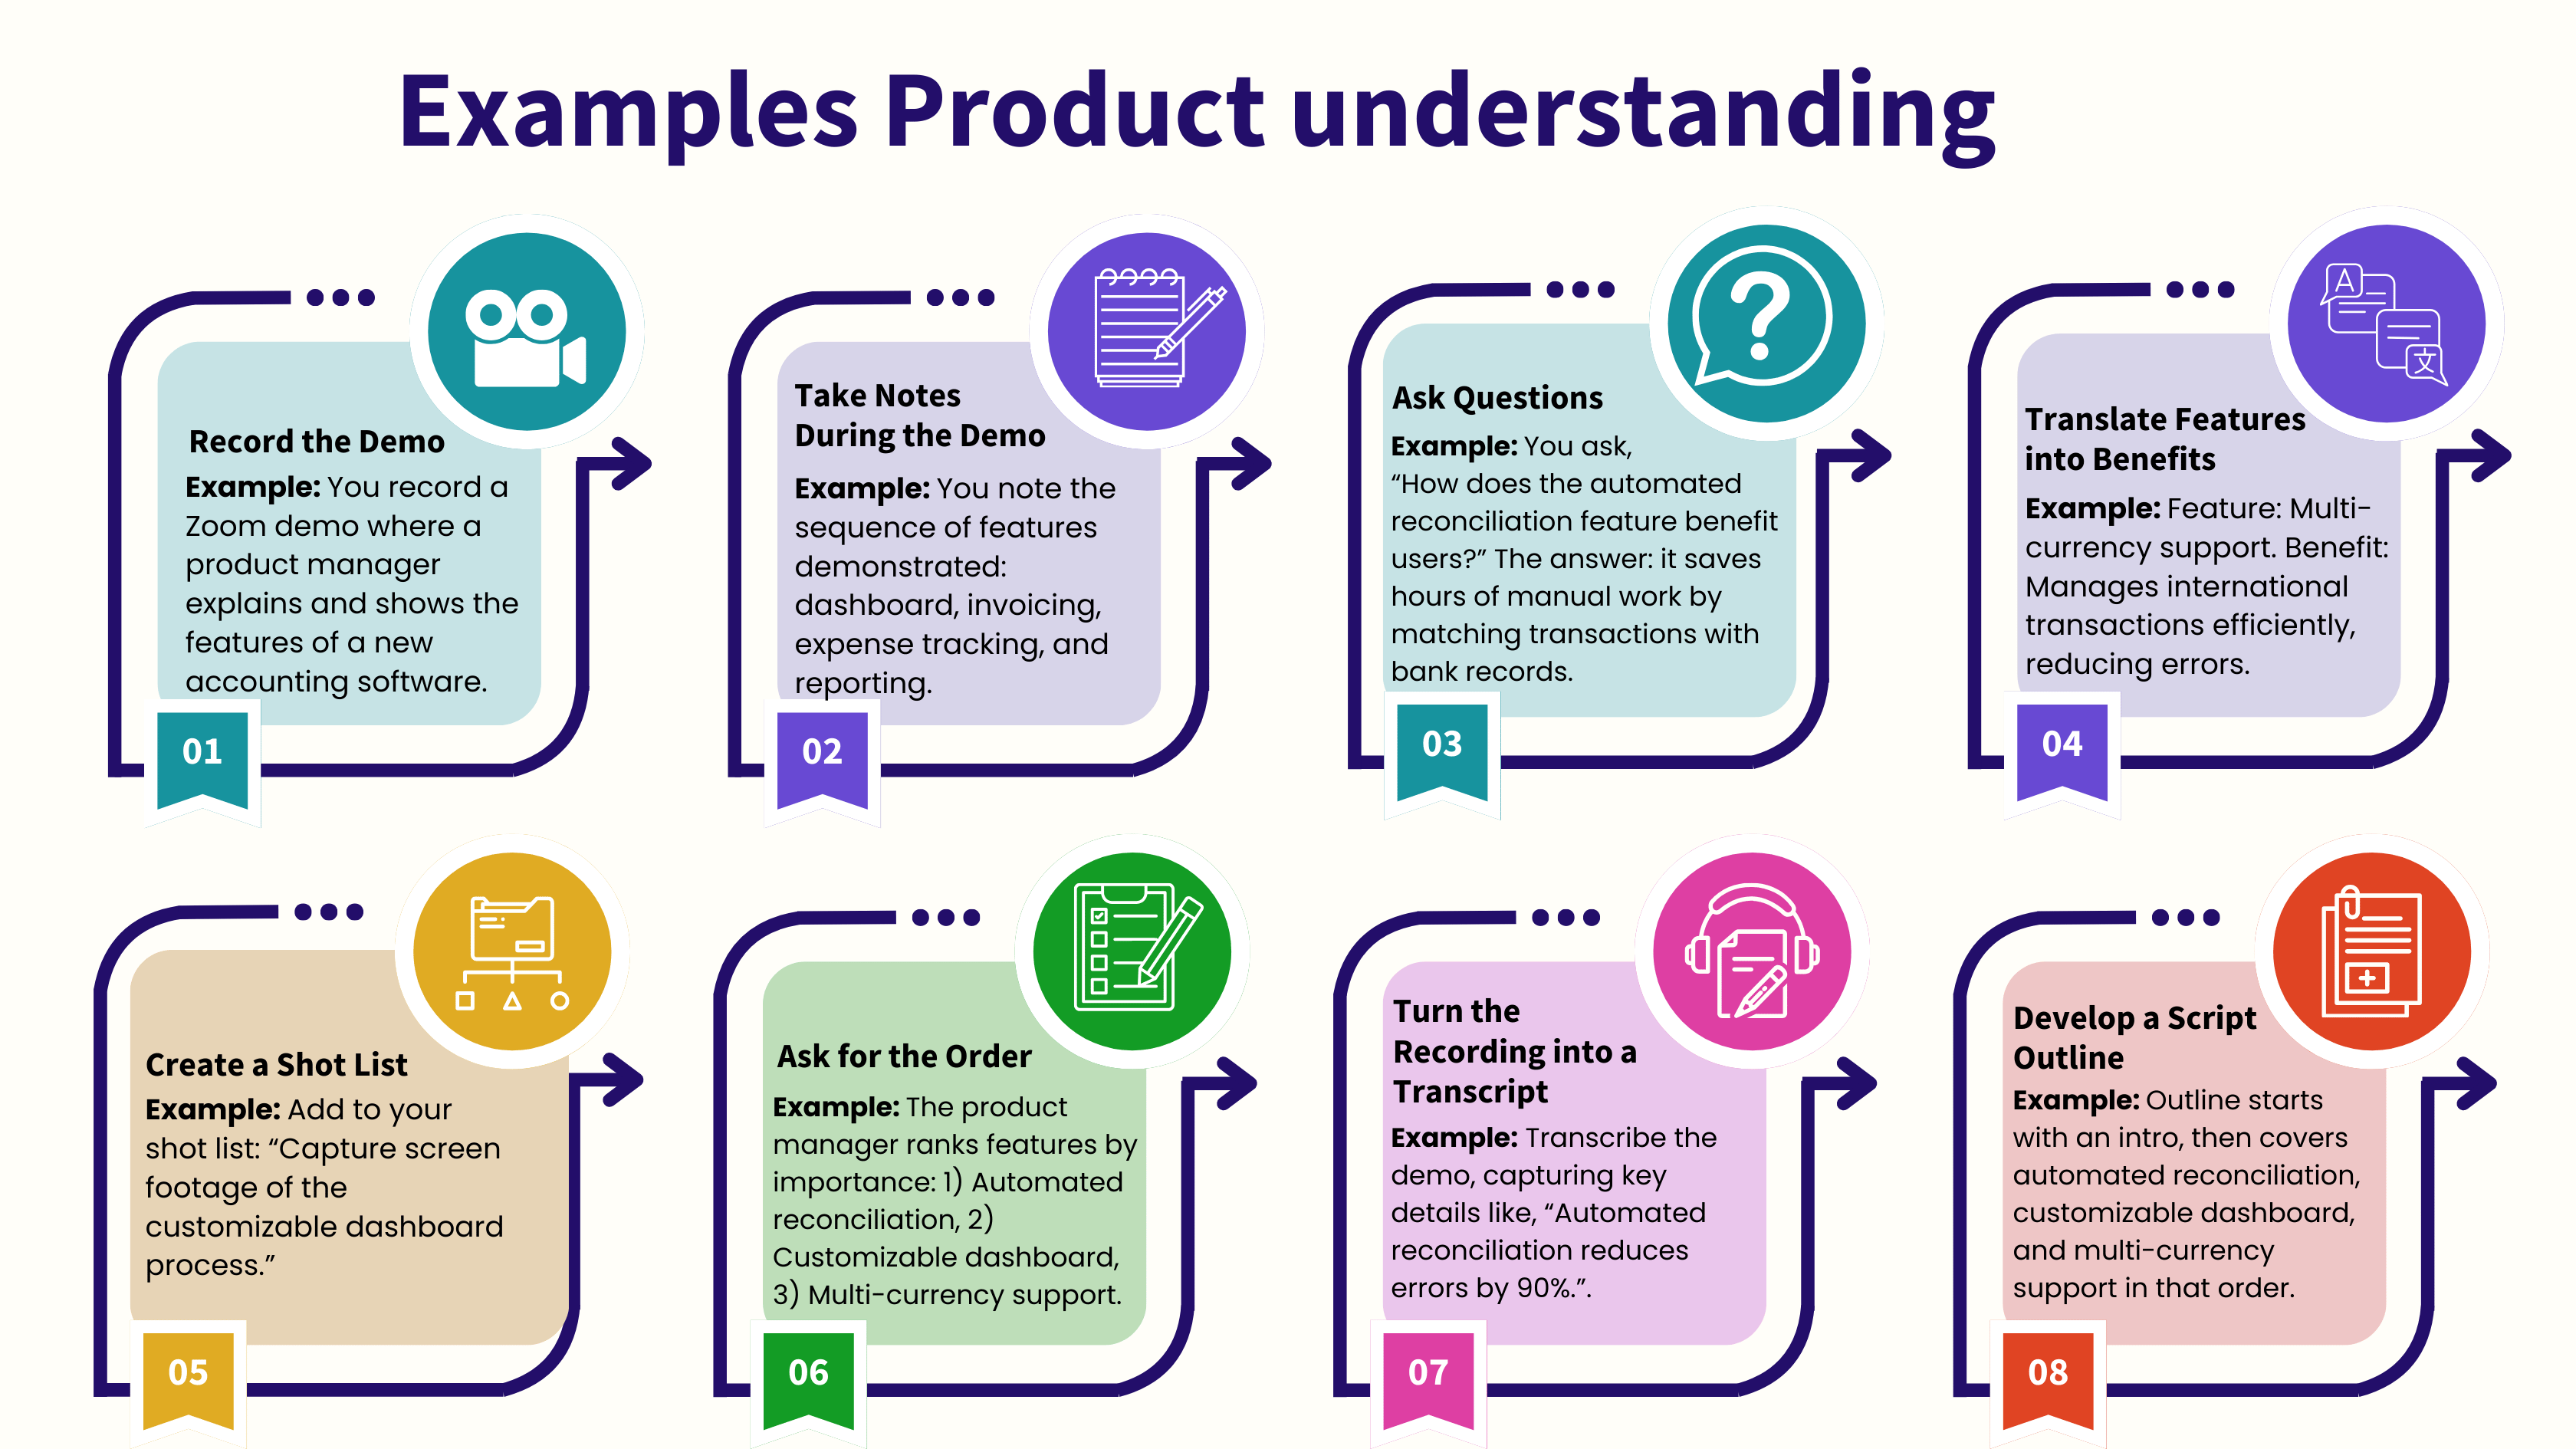
I have structured eight steps to help you conduct a successful product tour. Let’s discuss them one by one:
Step 1: Record the demo.
Step one is all about recording. You must record the audio and video of the salesperson or SME demonstrating the product. This practice will help you ensure that you haven’t missed any details.
Step 2: Take notes.
Take notes of the key points and focus on the main topics, structuring them one by one for your video script.
Step 3: Ask Questions.
Do not be afraid to ask questions. Ask the salesperson if you have any questions about the product, such as the reason behind a specific feature or benefit or any other related question.
Step 4: Translate the feature into a benefit.
Understand the value of the proposition. Ask about the product’s features from the demonstrator and tell them to translate each feature into a tangible benefit for the end user.
Step 5: Create a list of shots.
Observe the demonstration thoroughly and list shots that should be captured during video making.
Step 6: Determine the Order.
Make the hierarchy of features and benefits determine the priority, which should be based on their impact on the audience. If needed, ask the demonstrator to rank each element for you.
Step 7: Convert the demonstration into the transcript.
When your product demonstration is finished, convert the recorded material into a transcript. This will help as the raw material for your video script.
Step 8: Develop a script outline.
After completing your transcript, you should create an outline for your video script. With the outline, you can easily flow the video, ensuring that each key point is covered and the video script has an engaging sequence.
Turn Your Transcript Into Outline
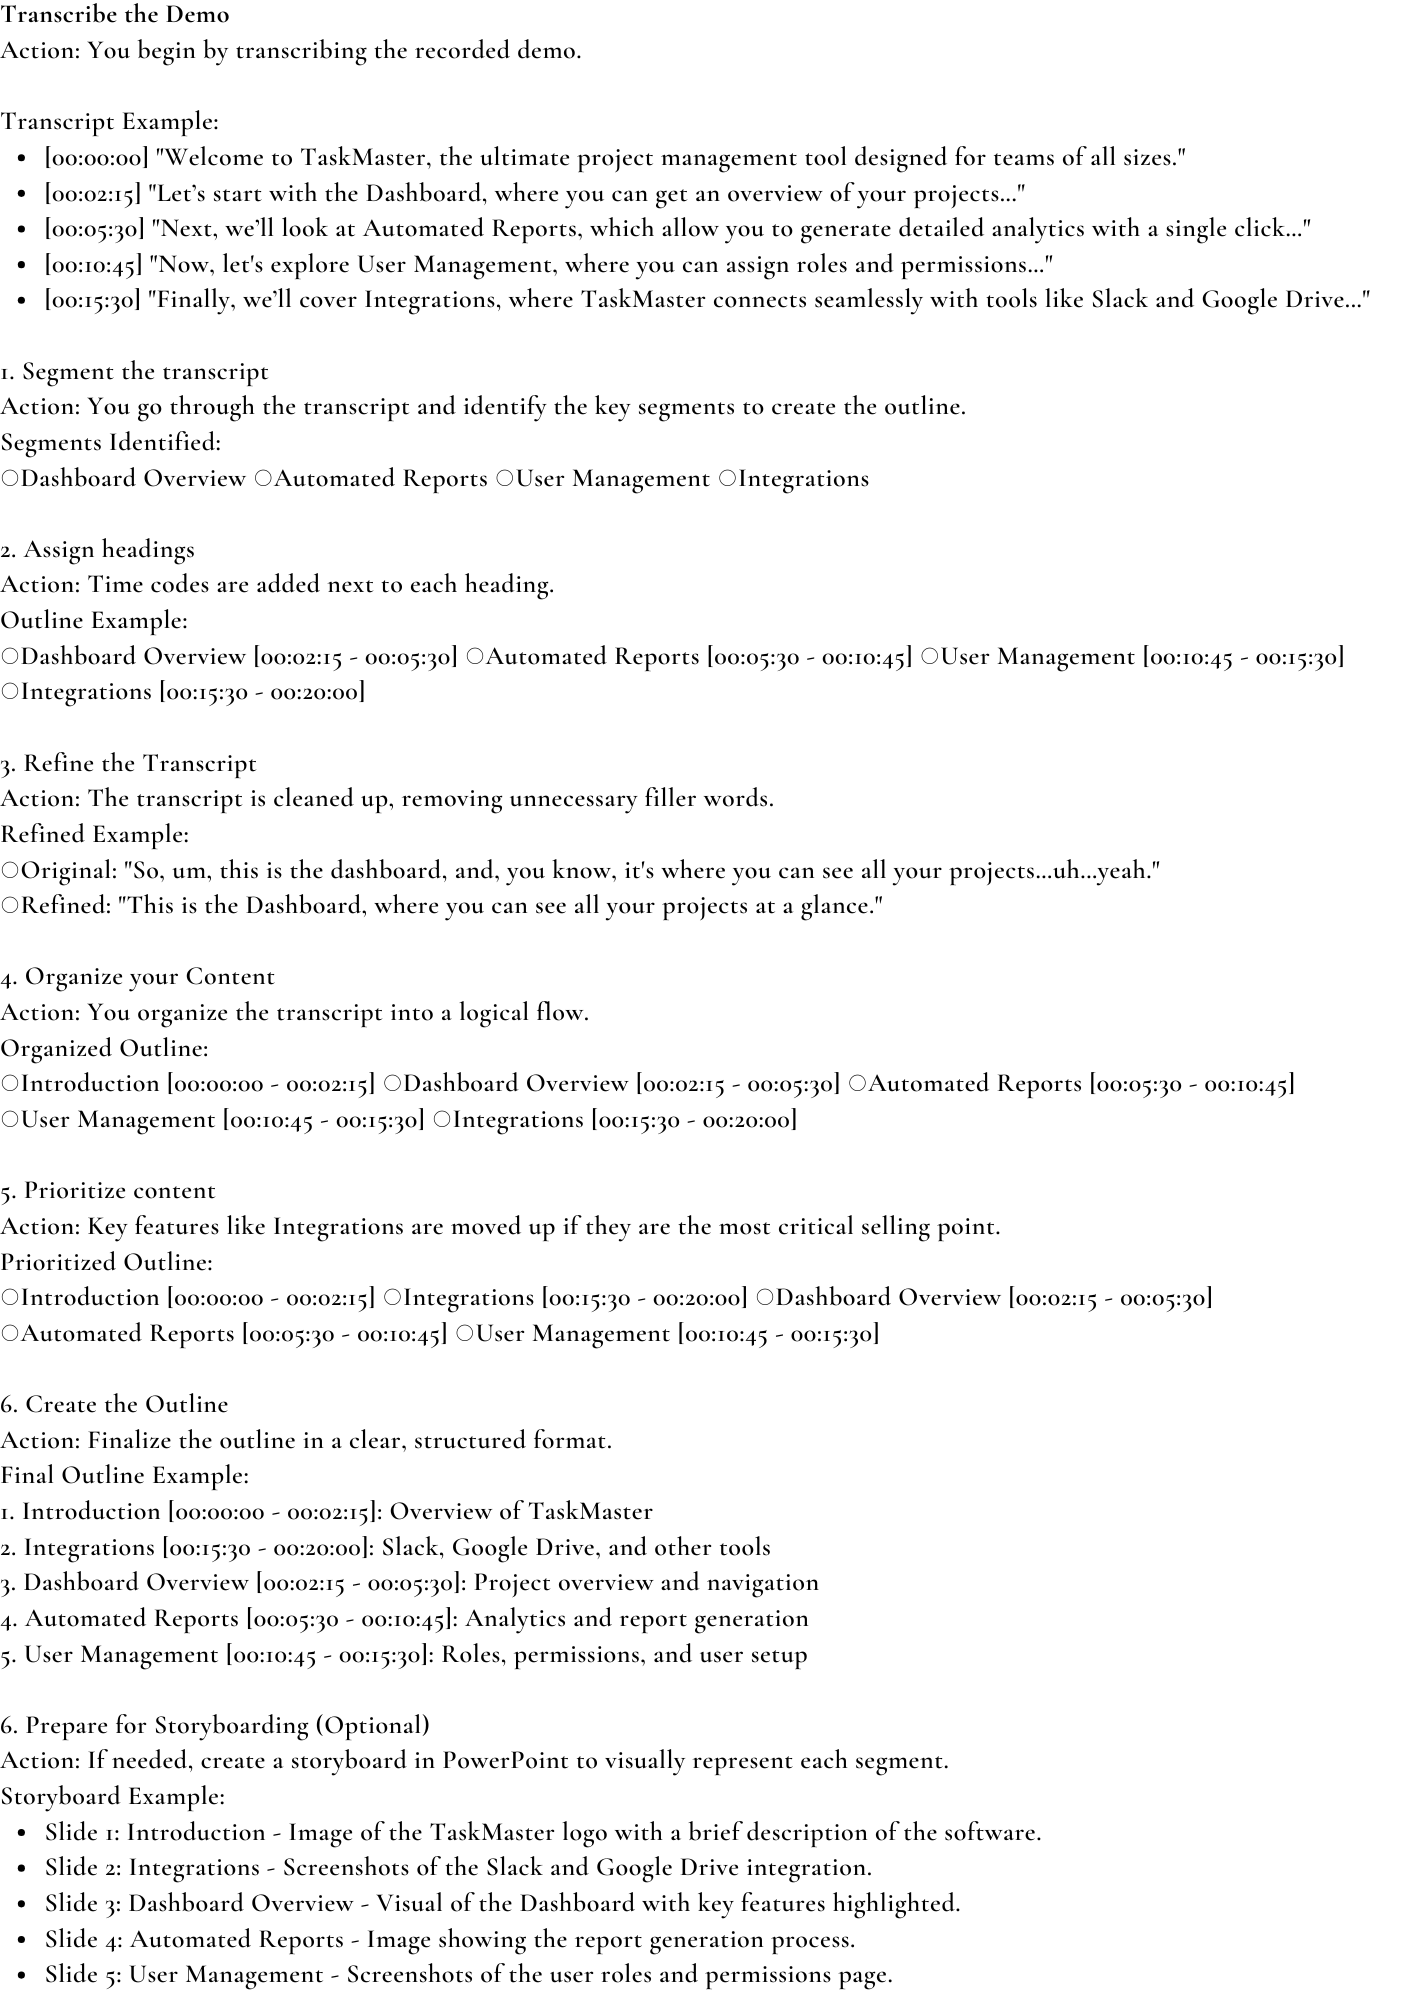
In this section, I will focus on using your demo transcript to create an outline of your video script. Once you have your product demo record, you can start transforming it into a structured outline.
I have created a process based on six steps, which will help you turn your transcript into a structured outline.
Let’s discuss each step one by one:
- Segment the transcript: The first step is to simplify scanning and dividing your transcript. You can split it into sections based on topics.
- Assign headings: In the second step, assign a heading (note start and end time code) to each segment. This will help you organize your work.
- Refine your transcript: After the second step, you will have an organized document in your hand. In the third step, to refine your document, proofread all content and remove unnecessary or irrelevant details.
- Organize your content: In the fourth step, organize your segment into a logical order that aligns with the video goals.
- Prioritize content: In the fifth step, identify the key message or most important points and place them at the beginning.
- Create Outline: Finally, structure your outline in a clear format. This ensures that all sections of your outline correspond to segments from the transcript and incorporate relevant time codes for your convenience.
- Use Storyboard (Optional): You can use a storyboard if you want to make a visual representation of each scene or if your client prefers visual representation. It enhances understanding. Just make sure each line of your storyboard represents a segment of your outline. With the help of a storyboard, you can ensure everyone is on the same page before video script writing begins.
Write the intro of the video
As you know, every explainer/ demo video consists of three main parts: an intro, a middle (the body), and an outro. In this section, I will discuss how to write an intro, which is the first impression your video makes.
This part is mainly used to introduce the product you are demonstrating, so it is important to immediately grab the audience’s attention.
There are three key rules for writing an attention-grabbing intro:
Open with action
Start with action shots that do not open with still images. Use strong visual action that immediately pulls your viewers in.
You can use visuals of:
- A quick demo of the product where it is being used.
- It is an engaging animation.
- A fast-paced visual.
Provide immediate context
In your intro, supply immediate context to your viewers, letting them know what they see on the screen to clarify what they will learn or see.
Grab Attention
Make sure your intro builds curiosity in the viewer’s mind and excites them about what will come next. Grab their attention through visuals and audio to hook your viewers within a few seconds.
Write the middle (the body)
In this section, I will discuss how to write the middle (the body) of the video. Remember that the middle part of the video requires too much effort because here, you demonstrate/ explain the product thoroughly.
When you are working in the middle, keep in mind three principles:
- Think Visually.
- Write for ears.
- Write to Match the Cadence of Your Visuals.
Think Visually
When you write a video script, remember that the audience primarily interacts with visuals, so it is essential for you as a scriptwriter to think visually.
There are three essential aspects that you should consider to complement this principle:
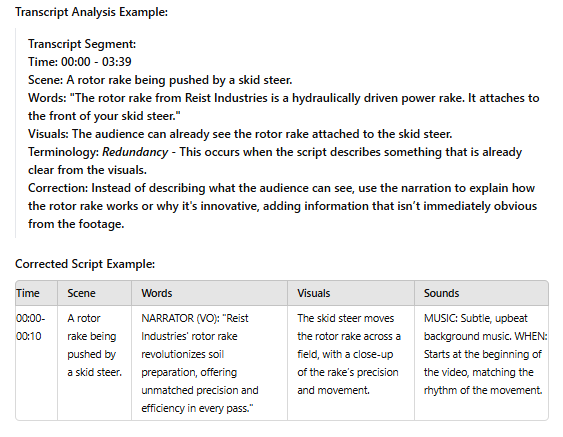
Don’t Describe What User Already Watch
As a video script writer, you must ensure that you are not describing things that viewers already understand through the visual.
In other words, if your viewer already sees a specific feature of the product and understands the concept through visuals, do not make an unessential effort by describing what the viewer has already seen.
Be careful when considering what you describe, and use words that complement visuals.
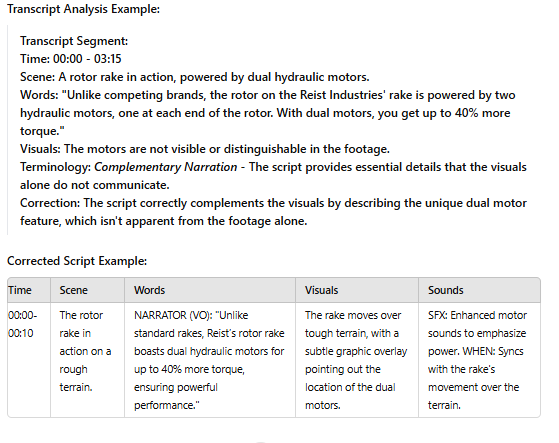
Fill the visual Gaps
Reduce complexity with the help of words. Some concepts or features can often not be understood easily by viewers only through visuals because of their complexity.
So, to make your message understandable, use words to provide the necessary explanation, details, or context.
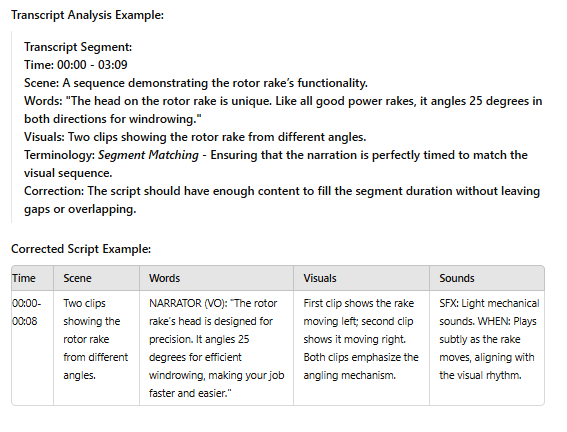
Match Words to visual
Timing is critical in scriptwriting. You must ensure that the duration of each visual segment matches the length of the narration, and both should be relevant.
Pro tip:
Keep in mind three things that will help you to understand the role of visuals:
- Always remember that video visuals are your primary communication tool.
- Your words act as a complement to enhance your understanding of visuals.
- Always make a balance between showing and telling.
Write for ears
As a scriptwriter, you must remember that your audience is not a reader but a listener. So make sure your script is easily understandable by the audience upon first hearing it.
So, write for ears, which means keeping the listener in mind while crafting the video script. You must also think about how words will sound when spoken out loud.
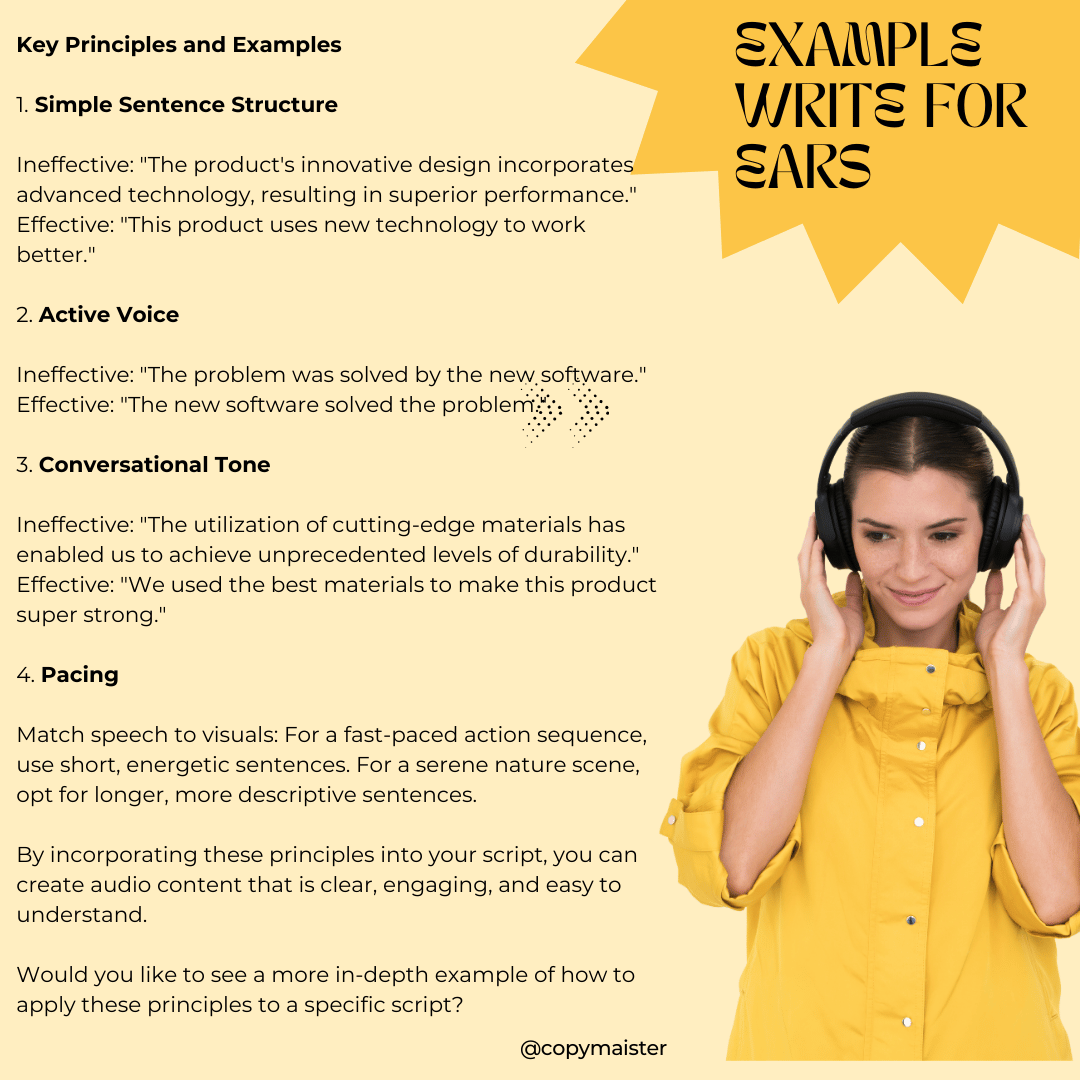
In order to master the art of writing for ears, there are some key principles you should follow:
- Use a simple sentence structure that is easily understandable. Complex sentences and multiple clauses can confuse the listener.
- Instead of passive construction, use active voice to make communication more direct.
- To engage your listener, keep your tone conversational, write the way you speak, avoid complex formal vocabulary, and use words you use in your daily routine.
- Match the pace in your video script between spoken words and visuals.
Write to Match the Cadence of Your Visuals
In this section, I will discuss how you can ensure that the words and visuals work together harmoniously to make your video effective.
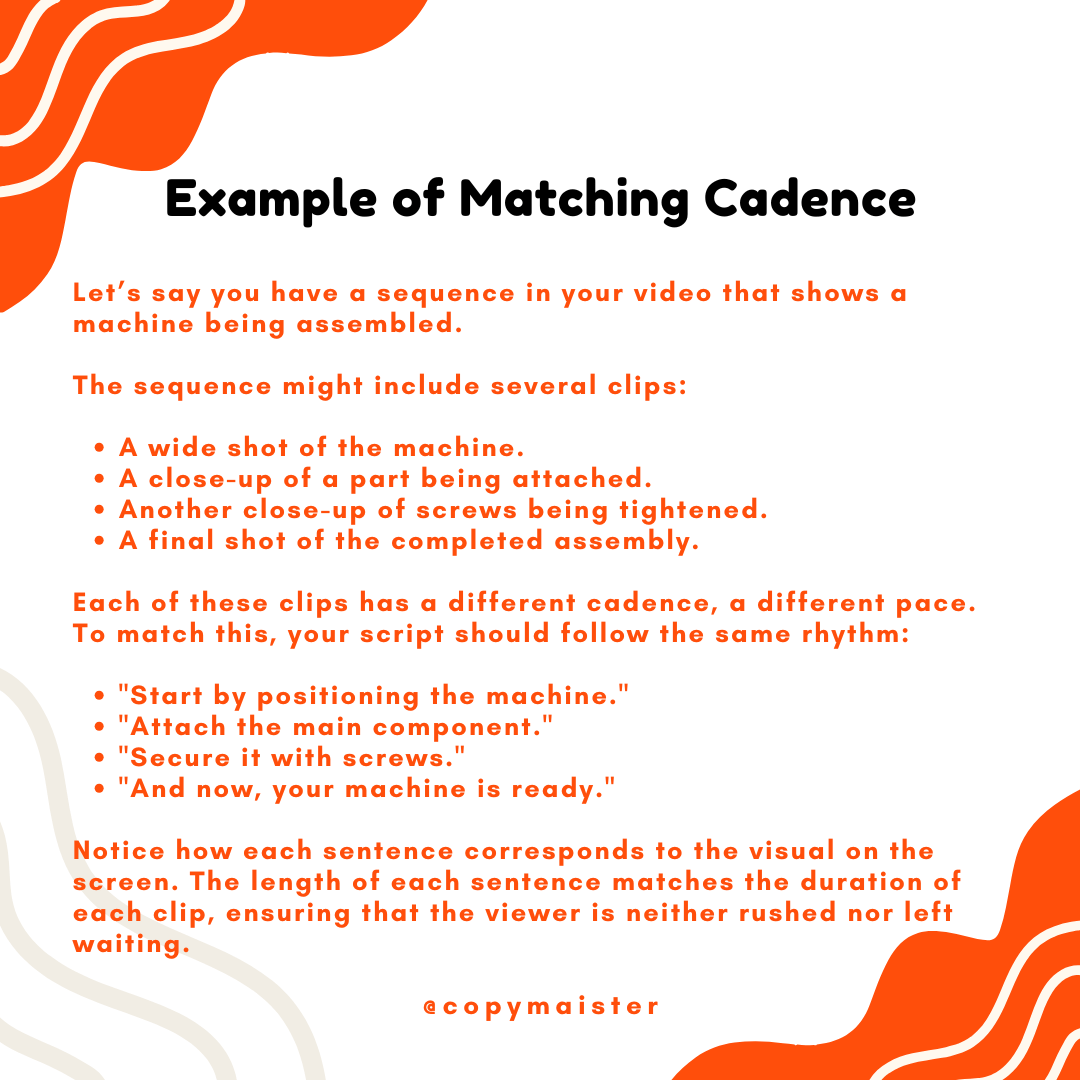
So, to achieve this task, you have to write to match the cadence of your visuals.
Cadence means the pace or rhythm of something. In video script writing, we consider cadence to be the synchronization between visual content and spoken words.
The flow, speed, and energy of the visuals must match your video script.
Make sure that each video clip and sequence on the screen moves at a certain cadence.
Write For Outro
In this section, I will discuss how to write an outro for a video script. It is all about closing with a purpose, not just closing a video. A well-crafted outro helps you leave a lasting impression.
Your outro should serve two key purposes:
- Summary.
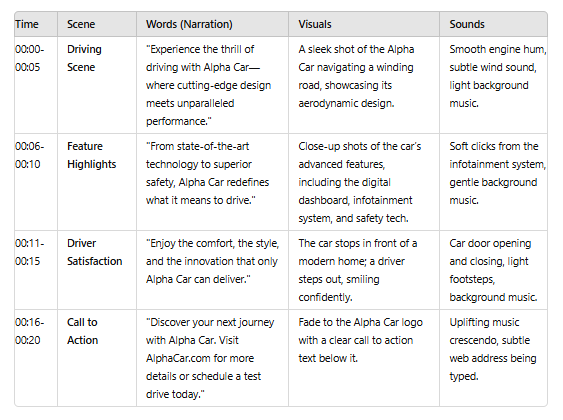
- Call to Action.
Summary
Summary means providing a brief recap of the main points you have covered in the video. The purpose of the summary is to remind the viewer of the video’s main message and key takeaways from your demo/explainer video.
Call to action
A call to action (CTA) directs viewers to take action, such as visiting a website, downloading a resource, or filling out a form.
Example of Outro (Alpha car):
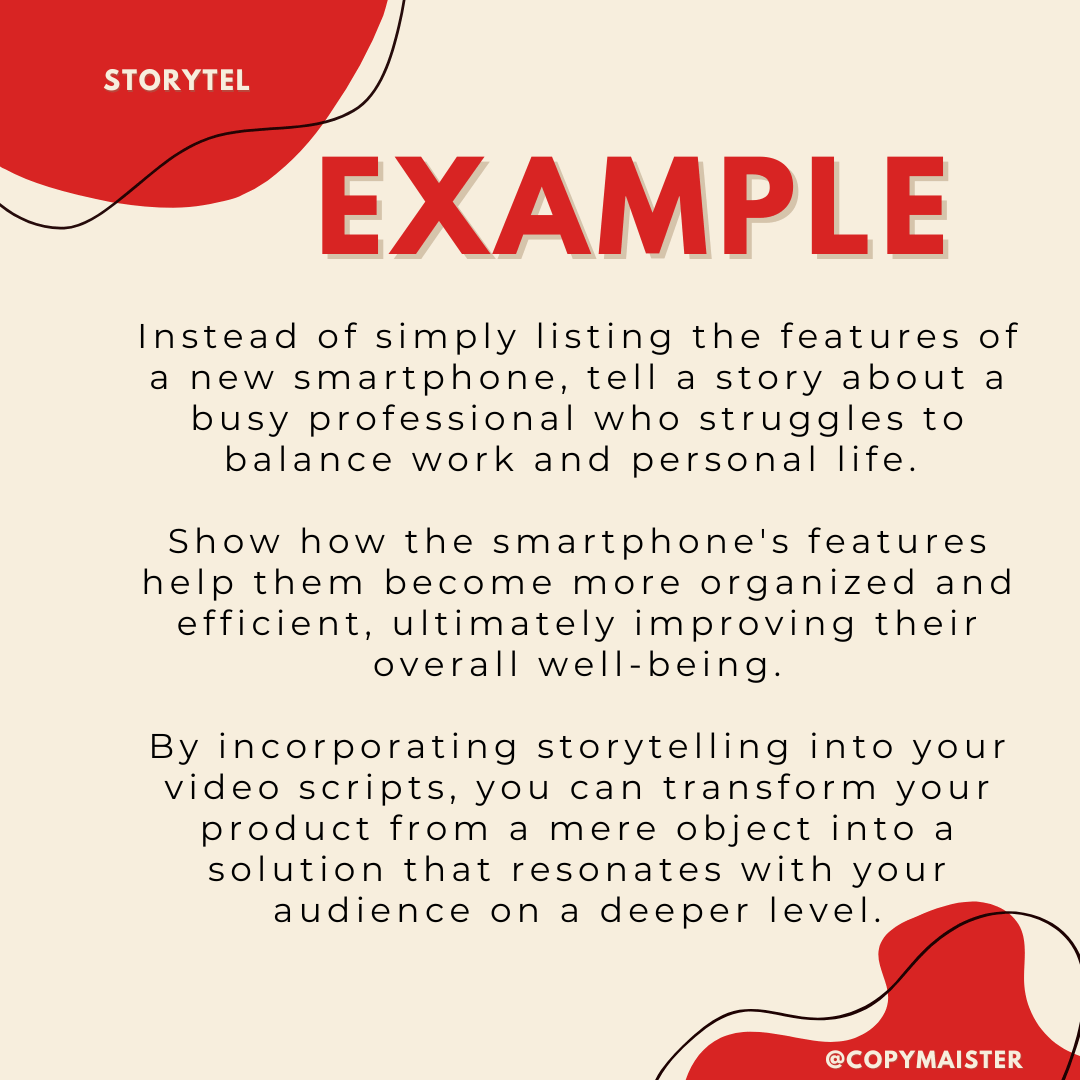
Tell a story
One common mistake I have noticed in many brands’ product demo/explainer videos is that they do not use a storytelling approach. Storytelling is a powerful way to engage the target audience on an emotional level, and it makes your video relatable and memorable.
There are four key elements of storytelling in video:
- Character: At the start, introduce a relatable character facing a problem or challenge.
- Plot: Develop a story around how your product solves the character’s problem.
- Resolution and conflict: Show the journey of how the problems initially created tension and then how they were overcome by using your product.
- Emotions: evoke emotions to connect the audience with your product emotionally through storytelling.
Conclusion
Crafting a product demo/explainer video script isn’t easy because it is not just about showcasing or providing information about the product’s features.
It needs a strategic approach where you have to master the following things:
- You have to have a clear understanding of the terminologies used in scriptwriting.
- You must understand how to write all three parts of the video: intro, middle (the body), and outro.
I have discussed everything in this guide so you can start from the beginning, even if you don’t understand the video script.
I have discussed with you how to make your intro attention-grabbing by using three rules: open with action, provide immediate context, and grab attention.
Then, for the middle part, I have discussed two key principles with you: think visually and write for ears to make it persuasive.
Along with it, you have learned how to craft a persuasive outro, how to use a summary, and how to use a call to action to make your outro engaging.
Following the guidelines I have discussed can help you craft your explainer/ demo video script easily. But if you still have any questions, you can email me.

